Monday, June 26, 2017

Visual Development Class

This month in my visual development class we have been learning some more advanced techniques and materials in maya as well as some great ways to tweak a final render through nuke.

We started out trying to match a reference image for placements of objects in the scene as well as the lighting that the scene will utilize.


After getting all the textures build throughout weeks 2 3 and 4 we rendered out the scene with lighting and textures.

We then batch rendered the scene breaking it up into the three different light sources.

This is the render of the IBL light

This is the render of the Key Light

And this is the render of the Warm Light

The batch render also allowed us independent control over things like the glossy reflections, diffuse reflections transmissions for glass etc.

By manipulating these different layers we were able to alter colors lighting on specific items and lights with precise control. This is the final image we rendered out of Nuke.

This month has definitely been a valuable learning experience for me. At first I felt like we were going to be doing the same things we had done in previous lighting and texturing classes. We did get a good refresher on some of the tools but there are many advanced techniques I had not gotten to experience yet that i learned this month. This was also my first time using the mila material which is a very versatile and customizable material for maya that I feel I will utilize a lot in the future. The techniques we learned for nuke were also very valuable I had no clue nuke could have that level of control over an image from maya. It felt like I almost had as much control over the materials as I would inside of maya but cutting down massively on render time.

Thursday, August 25, 2016

Zbrush Research Project

Production Modeling Zbrush Research Project

For my research assignment in my Production Modeling course at Full Sail University I chose to learn how to create my own brushes in z-brush as it seems to be a skill that would prove invaluable in improving my experience and ability to create in z-brush in the future.

2D Plane for experimenting with my brush shape
  1. First I found a video that covered the process and took notes on how to go about creating my new brush I found an excellent walk through here.
  2. After taking my notes and I went to z-brush and began constructing my new brush.
  3.  I cloned the standard brush to create a new brush that I could edit.
  4. I made my 2D plane to experiment with my brush shape with.
  5. I found the Edit curve box as the video instructed to alter the shape of the brush.
I settled on this curve shape because it resembled a ripple which seemed like it would make a useful brush.

After a little experimentation on my own with the brush menu I found a sub menu for samples in which a option to allow buildup was included. I found when I enabled buildup and placed ripples right next to each other they amplified one another as they would if two ripples intersected in real life.
After getting everything set up the way I liked it I saved out the brush as Ripple.

At this point I went to the tool menu and loaded up a sphere 3D as instructed in the video to create my custom icon for my new brush.

This is the way I decided to capture my new brush icon I altered the lighting a bit so that it would catch more than just the center of the ripple.

After rendering the new brush icon I wend to the drop down menu.

I selected my render and saved it out as ripplebrush.psd I moved into photoshop and cut down the image into a square and then saved.
I set the new brush Icon by clicking the select Icon Button.

Here is what the final version of my brush icon looked like.


Here is a short demo of my new ripple brush.

Tuesday, May 31, 2016

  Character Design and Creation Final Project  

        The final project for my Character Design and Creation class at FullSail University had its fair share of challenges but over wall was a very rewarding experience.

What worked and what didn't?

        I had some issues with sculpting in z-brush but my main issue was connecting the fingers to the hand. I thought I had done everything correctly when it came to combining the meshes but it is apparent that there were some issues when the seam between the hands and fingers didn't want to smooth out properly. It took me a while but I figured out that I hadn't re-meshed the sculpt properly and when I re-meshed it went much smoother. I learned a lot about re-surfacing in maya when I was working on this project. I found out you can use your normal extrude tools when you are resurfacing and things still follow the shape of the object being re-surfaced. I only discovered this when I reached the hand but it made re-surfacing go much faster because I could extrude whole edges instead of just going block by block.

What Would I do differently next time?

        If I were to do this again I would have taken more notes while I was working and taken more screen shots so that I had more content for this portion of the assignment. I did grab a few screen shots but I didn't get enough to really show the full development of the project. Also the project was so time consuming I cant really remember a lot of the specific issues I had with the project that I can share in this break down. I would also make sure the re-mesh properly to begin with when connecting the finger to the hand. Because of this I don't think things look exactly right in this area of the model.

Did you encounter any major issues, if so, how did you adapt?

        I had a few hiccups along the way on this project as mentioned earlier there was issues with z-brush but I also had an issue with building the mesh for my arm. The issue was with integrating box junction on the knuckles and elbows and other joints. The reason this was an issue for me is because my mesh was already very dense to trying to integrate the box junctions seemed over kill when it came to the density of the mesh. I did insert normal box junctions at the elbow but instead of doing full box junctions on the knuckles I opted to make just the closing portion of the box junction so like half a box junction just to loosen the mesh a bit so it wasn't so dense and that way by the time I got to the finger tips it was much easier to close off the mesh.

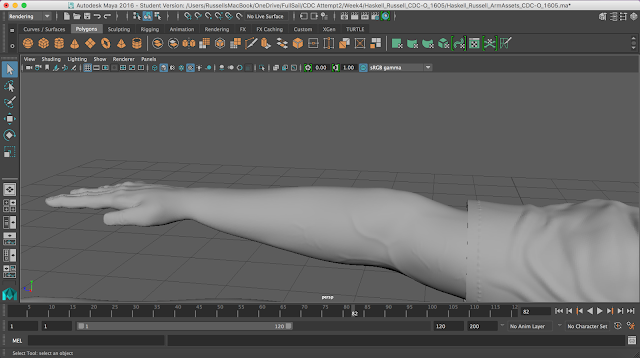
Here you can see the way I utilized just the closing portion of the box junctions to declutter the mesh a bit.

How did the end result come out?

        The final product of all my work came out okay. I mean I am satisfied and it doesn't have any major issues and it passes off as a fairly nice model. Upon close inspection however I think there is definitely a lot of space for improvement. The mesh works over all but there are some places where I think it could have been planned out better. The problem early on with z-brush left some issues with the fingers including an issue with the normal map between the fingers so things there don't look all that great. The model could use some polishing but over all I think I am moving in the right direction.

Here is an image of the base arm and sleeve that was made in z-brush prior to any major sculpting.
Here is an image of the final sculpted version of the arm and sleeve from z-brush.

Here is an image of the final resurfaced arm and sleeve after it has had its normal map applied.